Secured Kibana dashboard with Angular and Spring Boot
The problem
There are a lot of examples of Kibana dashboard implementation on websites via iframe and Nginx, but what if you already have a secured website and you need to implement Kibana which is also secured on elastic? Furthermore, clients should not see elastic login; the iframe should fit into the website like it’s fully a part of it. I will show you how to do it with Spring Boot, Angular and Nginx.
Prerequisites
- WSL2 (if you are using Windows, for Nginx and Docker)
- Docker (if you want to run Kibana locally)
The plan
This is architecture plan that we will set up:
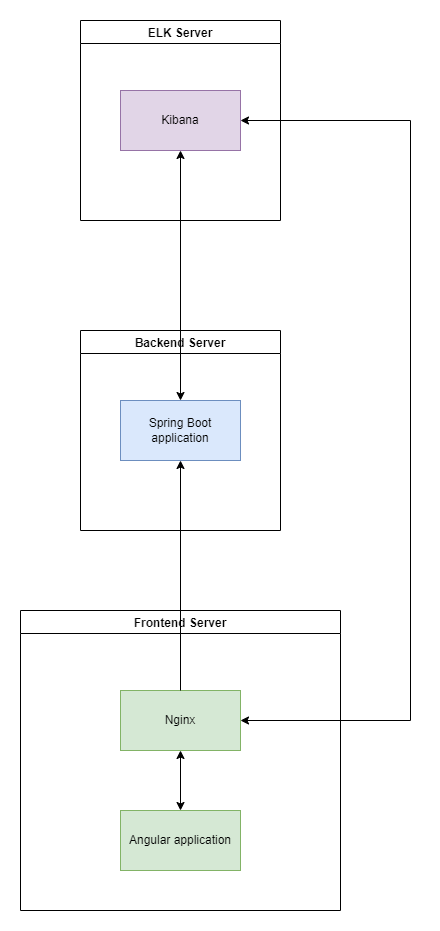
You can find project Git repo here
Setup
So first let’s install and run the Kibana container. Don’t forget to run elastic with the following env flag -e "discovery.type=single-node" for local testing; otherwise, you will run into errors. Kibana depends on elastic so after starting it you will see this output with an elastic user password and enrollment token which you will need to start Kibana. Also, you can see the Kibana version here which we will need later.
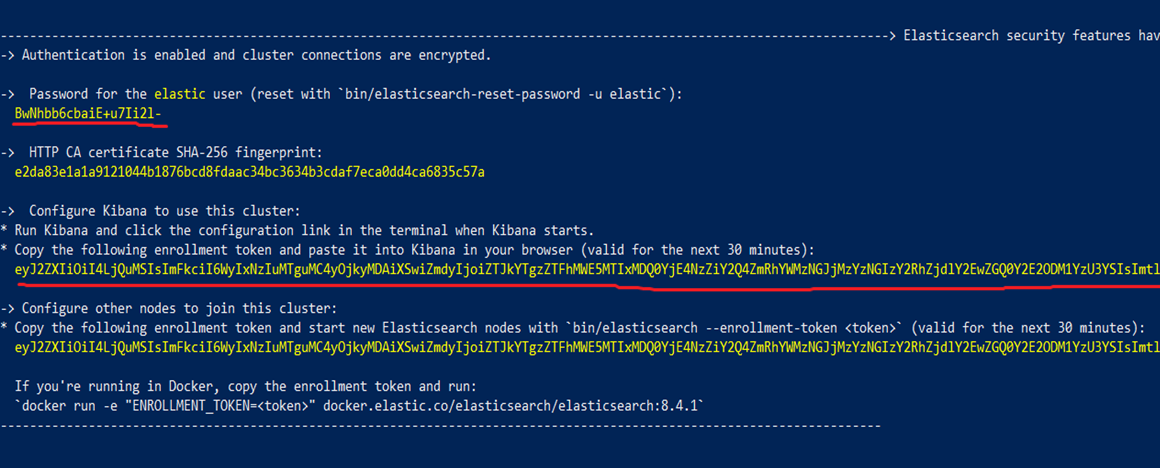
After elastic, we can run the Kibana docker container as described on the linked elastic site.

Now we can wait a few seconds for the startup to complete and access Kibana on http://localhost:5601/?code=CODE_THAT_YOU_GOT
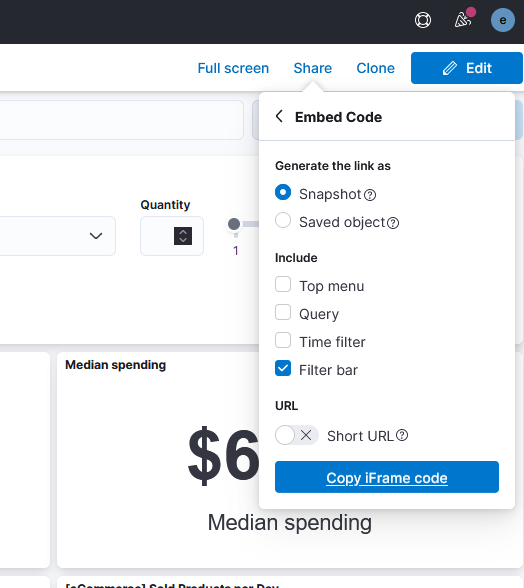
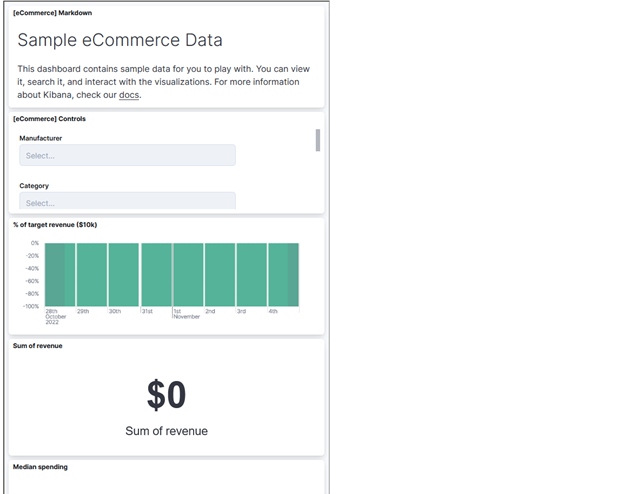
Kibana will now prompt the enrollment token that you got on the shown elastic shell and after that, you can be prompted for code which you can copy from another shell where you started Kibana from. Kibana is now started and we can add a demo dashboard by clicking on “Try sample data” from the home screen and then “Other sample data sets” and choose the one that you prefer. Under your sample, you can click to show your dashboard. When you want to share your dashboard on another website, you can click on “Share” and “Copy iFrame code”
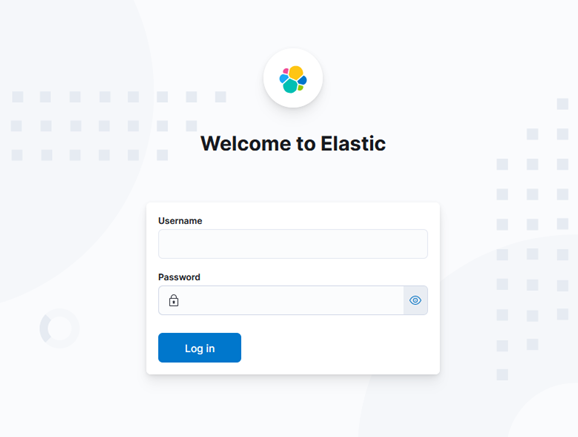
If you paste the given code into an HTML file, you can see what our problem is. Elastic is, of course, asking for credentials.
This can be easily bypassed by disabling security or setting an API token and using it with every request through Nginx or your backend. But what if your web application should handle multiple clients with different Kibana instances or/and users? In this case, we need to log in user for each of our clients on the backend and send Cookie back to the frontend. For all this to work we need also to do reverse proxy with Nginx to make Kibana the same origin as our frontend application.
Spring Boot application
Our backend will be written in Java Spring Boot so go ahead and create a new app with Spring Initializer (or CLI if you like it more). I will name my project kibana-test-back and add only security and web dependencies + Lombok and HTTP client:
dependencies {
   implementation 'org.springframework.boot:spring-boot-starter-security'
   implementation 'org.springframework.boot:spring-boot-starter-web'
    implementation 'org.projectlombok:lombok:1.18.20'
   implementation 'org.apache.httpcomponents:httpclient:4.5.10'
   testImplementation 'org.springframework.boot:spring-boot-starter-test'
   testImplementation 'org.springframework.security:spring-security-test'
   annotationProcessor 'org.projectlombok:lombok'
   annotationProcessor group: 'org.springframework.boot', name: 'spring-boot-configuration-processor'
}
We will also set up simple Spring Security configuration with one user and restricted endpoint (basic auth):
@EnableWebSecurity
public class SecurityConfiguration {

    @Bean
    public PasswordEncoder passwordEncoder() {
        return new BCryptPasswordEncoder();
    }

    @Bean
    public InMemoryUserDetailsManager userDetailsService() {
        UserDetails user = User.withUsername("user1")
                .password(passwordEncoder().encode("password1"))
                .roles("USER")
                .build();
        return new InMemoryUserDetailsManager(user);
    }

    @Bean
    public SecurityFilterChain filterChain(HttpSecurity http) throws Exception {
        return http
                .csrf().disable()
                .antMatcher("/api/kibana/dashboard")
                .authorizeRequests(authorize -> authorize.anyRequest().hasRole("USER"))
                .httpBasic()
                .and().build();
    }

}
Also, I have added a simple CORS filter to avoid CORS issues in this example project. Spring will scan and find it automatically.
@Component
@Slf4j
public class SimpleCORSFilter implements Filter {

    public SimpleCORSFilter() {
        log.info("SimpleCORSFilter init");
    }

    @Override
    public void doFilter(ServletRequest req, ServletResponse res, FilterChain chain) throws IOException, ServletException {

        HttpServletRequest request = (HttpServletRequest) req;
        HttpServletResponse response = (HttpServletResponse) res;

        response.setHeader("Access-Control-Allow-Origin", request.getHeader("Origin"));
        response.setHeader("Access-Control-Allow-Credentials", "true");
        response.setHeader("Access-Control-Allow-Methods", "POST, GET, OPTIONS, DELETE");
        response.setHeader("Access-Control-Max-Age", "3600");
        response.setHeader("Access-Control-Allow-Headers", "Content-Type, Accept, X-Requested-With, remember-me");

        chain.doFilter(req, res);
    }

    @Override
    public void init(FilterConfig filterConfig) {
    }

    @Override
    public void destroy() {
    }

}
We will build a classic MVC example with one endpoint for fetching the dashboard and authorized cookie, so we will not be greeted with Elastic login page and instead will see the dashboard automatically in our client app.
Our Kibana controller will look like this:
@RestController
@RequestMapping("api/kibana")
public class KibanaController {

    private final KibanaService kibanaService;

    public KibanaController(KibanaService kibanaService) {
        this.kibanaService = kibanaService;
    }

    @GetMapping("dashboard")
    public ResponseEntity<String> getDashboard() {
        return kibanaService.getDashboard();
    }

}
Our service will have one exposed method for fetching the dashboard for the current user:
@Override
public ResponseEntity<String> getDashboard() {
    UserDetails user = (UserDetails) SecurityContextHolder.getContext().getAuthentication().getPrincipal();
    HttpHeaders headers = new HttpHeaders();
    headers.add("Set-Cookie", getElkCookie(user.getUsername()));
    return new ResponseEntity<>(userElkMap.get(user.getUsername()).getKbnDashboardPath(), headers, HttpStatus.OK);
}
In the method getElkCookie, we are checking if the cookie for this user is already available to avoid another request.
public String getElkCookie(String username) {
    try {
        if (elkCookieMap.containsKey(username)) {
            return elkCookieMap.get(username);
        }
        HttpEntity<String> httpEntity = elkLogin(userElkMap.get(username));
        String cookie = httpEntity.getHeaders().getFirst("Set-Cookie");
        elkCookieMap.put(username, cookie);
        return cookie;
    } catch (Exception e) {
        log.error(e.getMessage(), e);
        return null;
    }
}
Otherwise, we are calling the elkLogin method to get the elk instance cookie which we forward as a header in the getDashboard method above.
public HttpEntity<String> elkLogin(ElkProperties elkProperties) {
    HttpHeaders headers = new HttpHeaders();
    headers.add("kbn-version", elkProperties.getKbnVersion());
    headers.add("kbn-xsrf", "true");

    String authUrl = elkProperties.getUrl() + "/internal/security/login";
    ElkLoginRequestDTO body = new ElkLoginRequestDTO();
    body.setParams(new ElkLoginParamsRequestDTO(elkProperties.getUsername(), elkProperties.getPassword()));

    try {
        return restTemplate.exchange(
                authUrl,
                HttpMethod.POST,
                new HttpEntity<>(body, headers),
                String.class
        );

    } catch (Exception ex) {
        log.error(ex.getMessage(), ex);
    }
    return null;
}
RestTemplate is already defined as a bean and you can find it in the configuration package. In the above examples, I have been also using userElkMap where elk instance properties are stored for each user instead of using DB.
private final ElkProperties elk1 = ElkProperties.builder()
        .url("http://localhost:5601")
        .username("elastic")
        .password("BwNhbb6cbaiE+u7Ii2l-")
        .kbnDashboardPath("/app/dashboards#/view/722b74f0-b882-11e8-a6d9-e546fe2bba5f?embed=true&_g=(filters%3A!()%2CrefreshInterval%3A(pause%3A!t%2Cvalue%3A0)%2Ctime%3A(from%3Anow-7d%2Cto%3Anow))&hide-filter-bar=true")
        .kbnVersion("8.4.1")
        .build();

private final Map<String, ElkProperties> userElkMap = Map.of("user1", elk1);
For this example, I have exposed raw sensitive data which needs to be encrypted or provided in different ways in a production environment.
You can get kbnDashboardPath with the above example of sharing embedded Kibana iframe. Just take that iframe src and remove the root domain. Other data are also from the start of this article. We are binding these data to user1 which we have defined in the security config.
All models defined here can be found in the code repo.
Angular application
Let’s create a simple Angular application that we will use for our Kibana dashboard. Your Angular application will most probably have secured pages and login but for the sake of simplicity, we will use just generated in-memory credentials from Spring Boot security. Also, we will not have any login setup here, but browsers will automatically ask us for credentials because of basic security on our endpoint that we will call when the client app starts. We will just use the existing app.component and our HTML will be just one iframe tag:
<iframe *ngIf="kibanaDashboard" [src]="kibanaDashboard | safe" (load)="iframeLoaded($event)" height="400" width="600"></iframe>The safe pipe is used to sanitize potentially harmful URL-s. Without it, dynamic URL-s will not work. It is custom made and you can also find it in the code repo.
TS file will be also quite simple:
export class AppComponent implements OnInit {
  kibanaDashboard = '';

  constructor(private kibanaProvider: KibanaProvider) {
  }

  ngOnInit(): void {
    this.kibanaProvider.getDashboard().subscribe(r =>
      this.kibanaDashboard = environment.frontendUrl + r)
  }

  iframeLoaded(e: Event): void {
    const ifr: HTMLIFrameElement = e.target as HTMLIFrameElement;

    if (ifr.contentDocument) {

      const mutationObserver = new MutationObserver(() => {
        if (ifr.contentDocument?.getElementById('dashboardListingHeading')) {
          return;
        }

        // Wait for the Kibana wrapper to fully load
        const kbnWrapperList = ifr.contentDocument?.getElementsByClassName('kbnAppWrapper');
        if (kbnWrapperList && kbnWrapperList.length > 0) {

          // Set correct Kibana iframe height
          ifr.height = kbnWrapperList[0].scrollHeight + 'px';
        }
      });

      const config = {
        subtree: true,
        childList: true,
        characterData: true
      };

      mutationObserver.observe(ifr.contentDocument.body, config);
      setTimeout(() => mutationObserver.disconnect(), 10000);
    }
  }
Inside OnInit we are fetching the dashboard from the previously created endpoint. The second part (iframeLoaded) is really useful if you want the iframe to fit well on the page so I added it to show how can it be done dynamically and regardless of dashboard height.
Kibana provider looks like this:
@Injectable({
  providedIn: 'root',
})
export class KibanaProvider {

  private apiUrl = environment.apiUrl + 'kibana/';

  constructor(protected http: HttpClient) {
  }

  getDashboard(): Observable<string> {
    return this.http.get(this.apiUrl + 'dashboard', {responseType: 'text'});
  }

}
Also, I have removed the prod environment file (and also file replacement options in angular.json) and my environment file looks like this:
const rootUrl = 'http://localhost:4200'

export const environment = {
  production: false,
  frontendUrl: rootUrl,
  apiUrl: rootUrl + '/api/',
};
As you see, all my requests (and iframe src) point to http://localhost:4200, so we will need to set a reverse proxy and get around the CORS issue. We will use Nginx installed on WSL2 on our instance. Linux users can just run it locally. This will simulate the production environment and allow us to use mentioned mutation observer on the iframe. One last thing is to run ng build to generate static files which we will use later.
Install and configure Nginx
On WSL (Ubuntu) you can install Nginx with the following command:
sudo apt install nginx
Now we need to configure reverse proxies for both the backend server and Kibana. Inside your WSL, you can add the following configuration block to your nginx.conf (/etc/nginx/) or create a new conf file inside the conf.d folder.
server {
                listen          4200;
                server_name     localhost;
                root            /mnt/c/Users/user/kibana-test-front/dist/kibana-test-front;
                index           index.html;

                 location / {
                        include mime.types;
                }

                location /api {
                        proxy_pass http://172.25.96.1:8080/api;
                        proxy_http_version 1.1;
                        proxy_set_header Upgrade $http_upgrade;
                        proxy_set_header Connection 'upgrade';
                        proxy_set_header Host $host;
                        proxy_cache_bypass $http_upgrade;
                        proxy_set_header X-Forwarded-For $proxy_add_x_forwarded_for;
                }

                location ~ (/app|/translations|/node_modules|/built_assets/|/bundles|/es_admin|/plugins|/ui|/elasticsearch|/spaces/enter|/bootstrap.js|/internal|/goto|/api/saved_objects|/api/core|/api/index_patterns|/api/telemetry|/api/metrics|/api/saved_objects_tagging|/api/ui_counters|/api/banners|/api/licensing) {
                         proxy_pass          http://172.25.96.1:5601;
                         proxy_set_header    Host $host;
                         proxy_set_header    X-Real-IP $remote_addr;
                         proxy_set_header    X-Forwarded-For $proxy_add_x_forwarded_for;
                         proxy_set_header    X-Forwarded-Proto $scheme;
                         proxy_set_header    X-Forwarded-Host $http_host;
                }
        }
Full example of nginx.conf can be found in code repo.
Let’s go through the configuration:
listen-> This is the port on which we are running the frontend app. In our case, it is the same as the Angular default port (4200).root-> Location of static web files. In my case, this is the default project build dist folder which is created when you run ng build. Feel free to modify this.location /api-> Here we define a reverse proxy for our backend app. In other words, we are setting IP address of our backend application location + endpoint to which we are proxying/apirequest from frontend application. The IP172.25.96.1is here because we are inside WSL and in this case, this is my Windows host address (Windows localhost) on which is also backend application running (with port 8080). You can get this address if you run this command inside WSL:grep -m 1 nameserver /etc/resolv.conf | awk '{print $2}'. If you are on Linux, you can put localhost instead.location ~ (...)-> This is the only practical way that I found is working for reverse proxying the Kibana dashboard. If you have noticed, Kibana has also some/apiendpoints, so I have intentionally set the same for the backend to show that it can work together. Again, inside the block, we are proxying to the Windows host IP address with Kibana port (5601)
After we save the file, we need to reload or restart Nginx with sudo service nginx reload or sudo service Nginx restart.
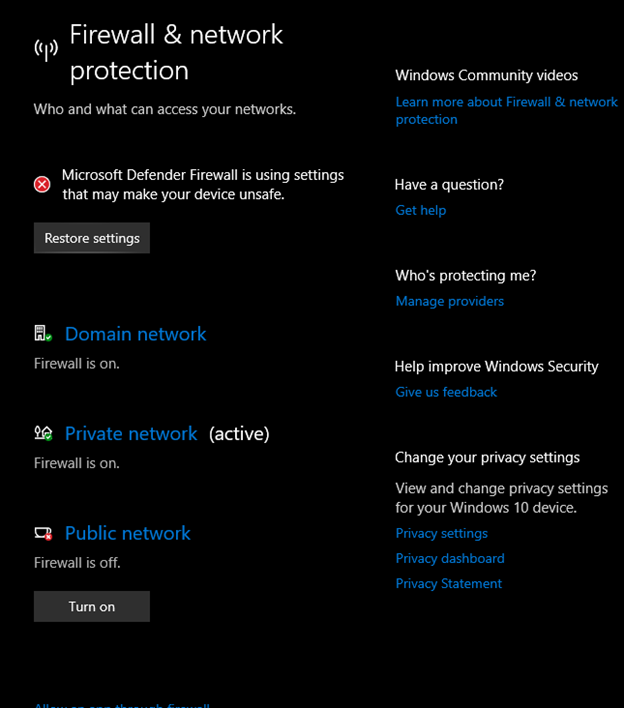
NOTE: Sometimes, Windows Firewall makes problems with connectivity, so you will need to disable Public firewall when you are testing the app.
If you try now to access http://localhost:4200 from your browser, you will need to enter previously created user credentials and should be able to see your dashboard which will also automatically change the height to fit dashboard content inside.
That’s it, we have our Kibana iframe working on our site with the option to change HTML inside it from our client app code. Also, if you open a private window and try to access this same dashboard directly, you will be greeted with elastic login instead of a Kibana dashboard. Keep in mind that the client application could have been written in any other technology (ReactJS, VueJS, etc.) and Angular serves here just as an example.